A shopper looking at your product can’t pick it up. They can’t turn it over, feel the material or check how big it really is. Every one of those questions gets answered by your photos, or it doesn’t get answered at all.
That’s why product photography does the selling on a product page. A blurry main image loses the click in search results. A missing size reference turns into a return. A color that looks different in person turns into a bad review.
The good news is that clean, accurate product photos don’t need a studio. They need a method. Here’s how to take product photos with the method we’d give any new store. You’ll also get the platform rules and the point where hiring help makes sense.
What Makes a Product Photo Sell?
A product photo sells when it is accurate, clear, consistent and compliant. Accurate means the color, size and texture match what arrives. Clear means the shopper can see the product without distraction. Consistent means every image in your store follows the same style. Compliant means it meets the rules of each platform you sell on.
Beautiful helps, but accurate matters more. A slightly plain photo that matches the product earns trust. A polished photo that oversells it earns returns.
The Product Photo Shot List Every Listing Needs
One good photo isn’t enough. A product page works like a conversation, and each image answers a different question a shopper would ask in a store.
| Shot | The shopper’s question | When you need it |
|---|---|---|
| Main image on white | What is it? | Every listing, required by marketplaces |
| Angles (back, side, top) | What does the rest of it look like? | Every listing |
| Detail close-up | Is it well made? | Products where material, texture or finish matters |
| Scale shot | How big is it? | Every listing, especially small or large items |
| Lifestyle or in use | How would it fit my life? | Most listings, a must for decor, apparel and gifts |
| What’s in the box | What exactly arrives? | Multi-part products, kits and gift sets |
| Color or variant shots | Which one do I want? | Products sold in several versions |
Shoot the full list in one session, without moving your setup, so every image matches.
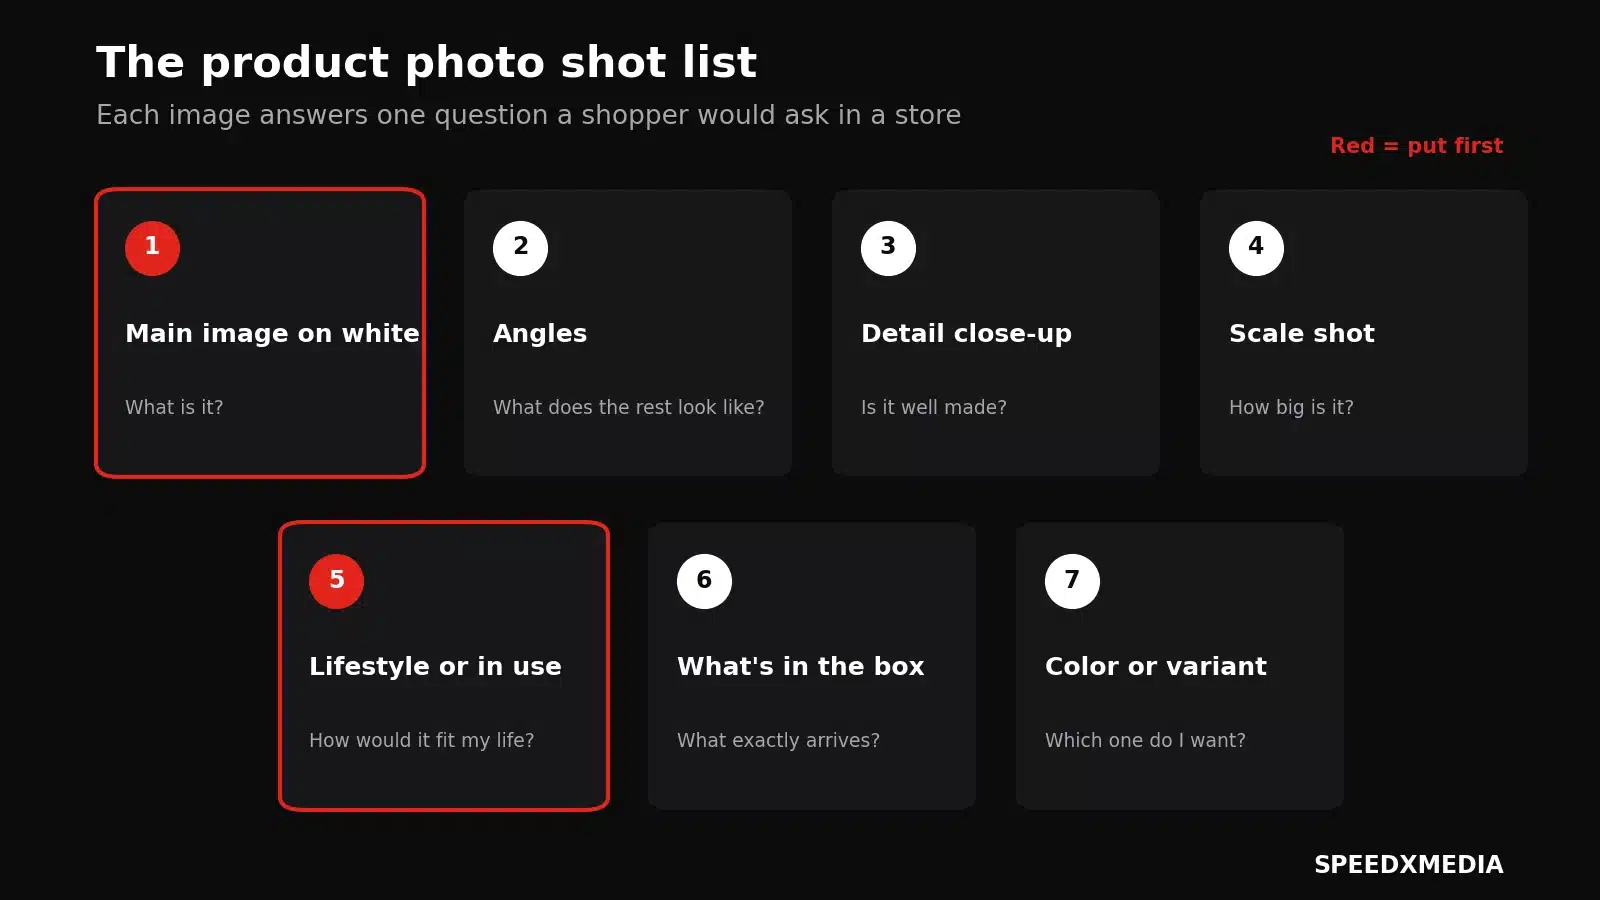
Six to eight images per product covers most stores. Put the main image first and the lifestyle shot second, because those two do most of the work in search results and on social.
What Equipment Do You Need for Product Photography?
Less than most guides suggest. Recent phones shoot product photos that are sharp enough for any online store. What phones can’t fix is bad light and a shaky hand, so spend there first.
| Stage | Equipment | Good for |
|---|---|---|
| Starting out | Phone, tripod with phone mount, white poster board, window light | Most small products and new stores |
| Stepping up | Two LED panels or softboxes, a reflector, a light tent | Consistent results any time of day, shiny items |
| Professional | Camera with a macro lens, tethered shooting, studio strobes | Large catalogs, jewelry, glass and fine detail |
A tripod matters more than any camera upgrade. It keeps every shot framed the same way, which is what makes a product grid look professional.
How to Light Product Photos
Soft, even light from one direction is what makes a product look real. Hard light from several directions creates harsh shadows and odd color casts.
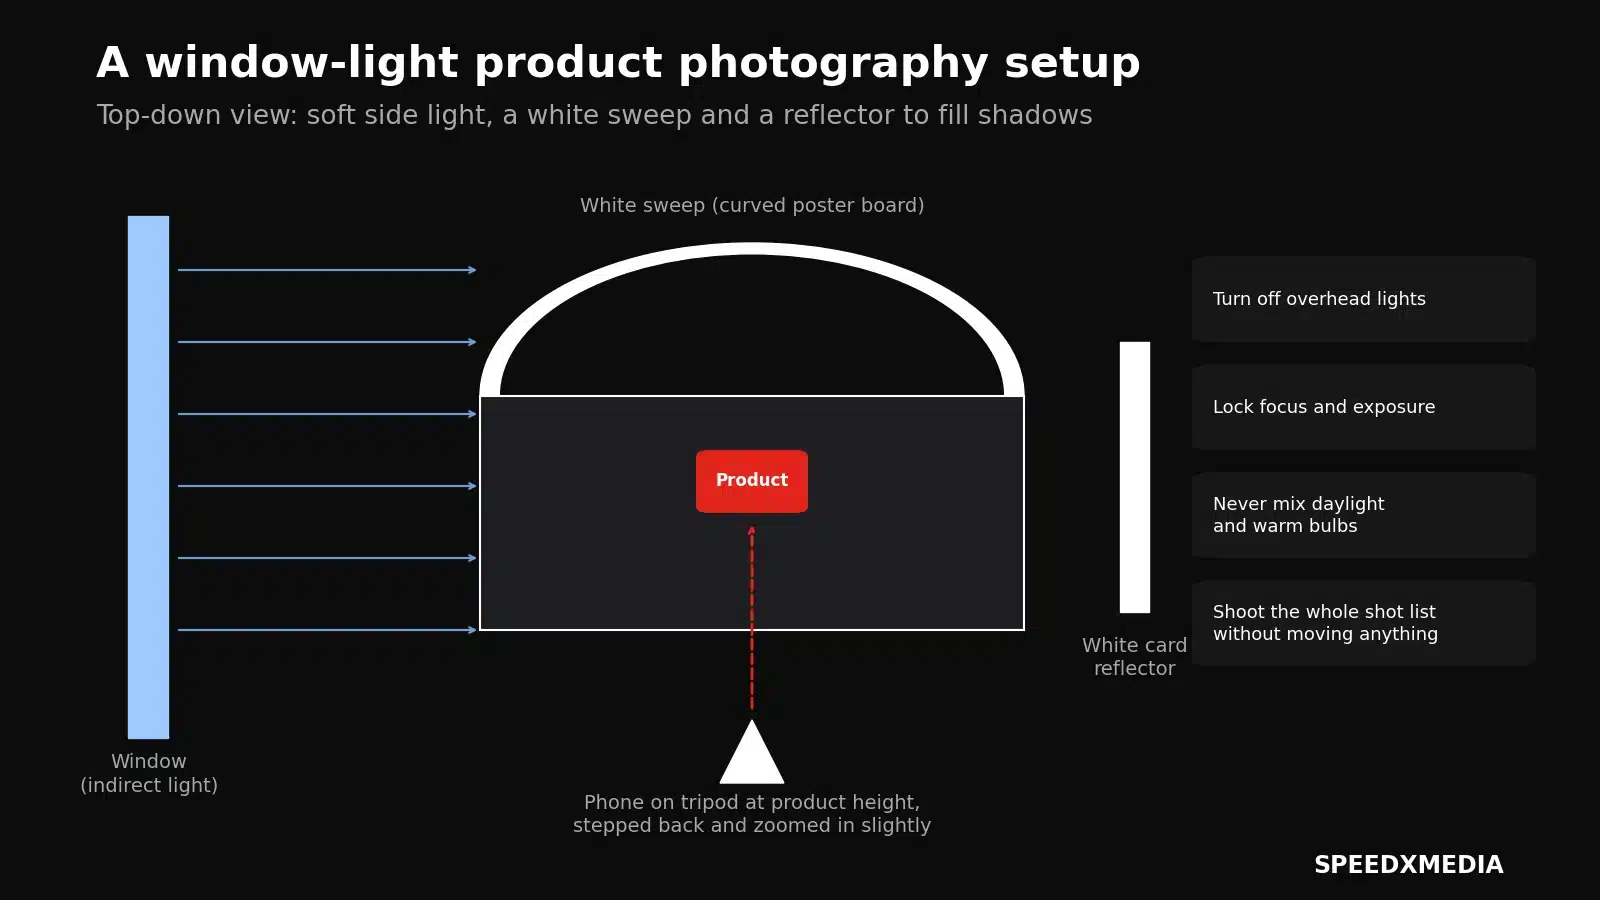
Window light is the easiest starting point. Place the product beside a large window, not in direct sun, and the light will wrap around it gently. If the sun hits the window directly, tape a thin white sheet over the glass to diffuse it.
When you move to artificial light, two LED panels set to the same daylight color temperature give you control at any hour. Place one at a 45-degree angle to the product as the main light. Use the second, or a white reflector, on the opposite side to soften the shadows. The rule that matters most is consistency: never mix daylight with warm indoor bulbs in the same shot, because the camera can’t correct for both.
How to Photograph Products on a White Background
White background photos are the backbone of most stores and the required main image on Amazon. Here’s the process step by step:
- Set up next to a large window with indirect daylight. Turn off overhead lights so colors don’t mix.
- Build a sweep by curving a sheet of white poster board from the wall down onto the table. The curve removes the horizon line behind the product.
- Place the product in the center of the sweep, a few inches in front of the curve.
- Put the phone or camera on a tripod at product height. Step back and zoom in slightly instead of shooting close with a wide lens, which distorts shapes.
- Tap the product to focus, then lock focus and exposure so they don’t shift between shots.
- Hold a white card or foam board opposite the window to bounce light into the shadows.
- Shoot the full shot list without moving the setup. Change only the product’s position.
- Edit each image. Push the background to pure white, crop to a square, and compare the color on screen against the real product.
That last comparison is the step people skip. Hold the product next to your screen. If the colors don’t match, fix the white balance before you publish.
How to Shoot Lifestyle Product Photos
Lifestyle photos show the product being used where your buyer would actually use it. They answer the question a white background can’t: will this fit my life?
- Pick a setting that matches your customer, not your apartment. A kitchen tool belongs on a real countertop, a backpack belongs on a commute.
- Use props that support the product without stealing attention. If a shopper asks which item is for sale, cut a prop.
- Add hands or people to show scale and use. A mug in a hand says more about size than a ruler does.
- Shoot a vertical version of every lifestyle image. It’s the format social feeds and phone screens favor.
Product Image Requirements for Amazon, Shopify and Google
Each platform sets its own rules, and a rejected image can keep a product from showing at all. These are the requirements that matter most for your main image.
| Platform | Background | Size | Other rules |
|---|---|---|---|
| Amazon (main image) | Pure white, RGB 255, 255, 255 | At least 1,000 pixels on the longest side to enable zoom | Product fills 85% or more of the frame. No text, logos, watermarks or props not included in the sale |
| Shopify | No required color | 2048 x 2048 pixels recommended for square images | Keep one aspect ratio across your store so grids line up |
| Google Merchant Center | No required color | At least 100 x 100 pixels, or 250 x 250 for apparel | No promotional text, watermarks or borders. AI-generated images must carry metadata saying so |
Google has announced a 500 x 500 pixel minimum for all product images from January 31, 2027.
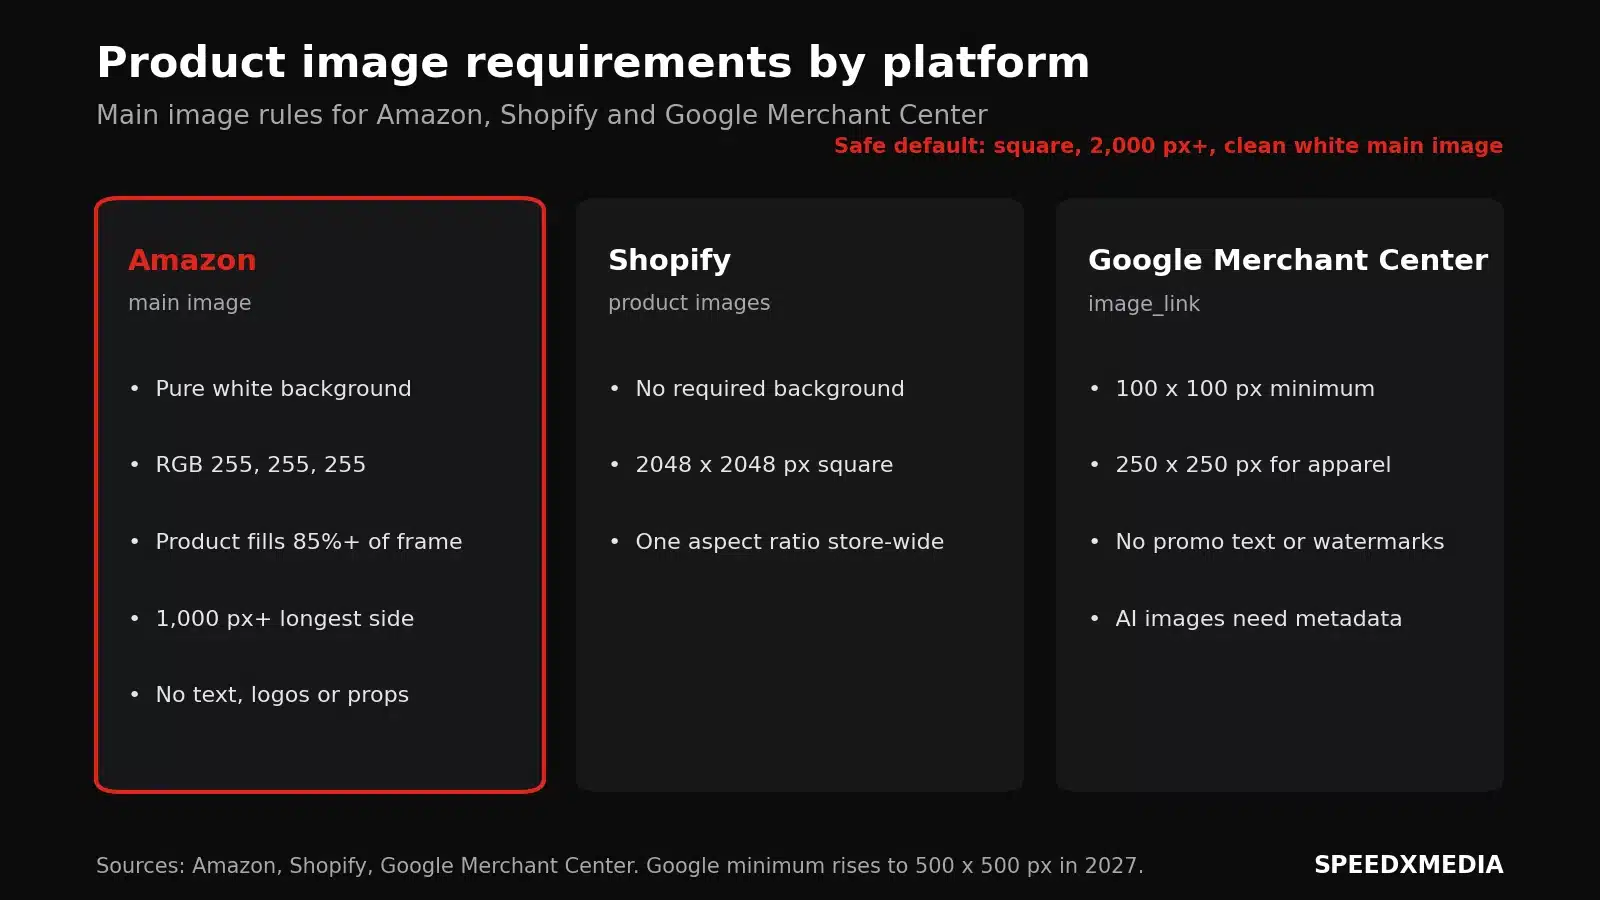
The simple way to satisfy all three is to shoot square and export at 2,000 pixels or more. Keep a clean white version of every main image.
How to Fix the Most Common Product Photo Problems
Bad product photos usually fail in one of five ways, and each one has a quick fix:
- Glare on shiny products. Move the light to the side and diffuse it through a thin white sheet or a light tent.
- Colors that don’t match. Set white balance manually or shoot a gray card in the first frame to correct against later.
- A gray background instead of white. Add light to the background itself, then finish the job in editing.
- Warped shapes. Step back and zoom in. Shooting close with a wide lens bends straight edges.
- A store that looks inconsistent. Mark your tripod and product positions with tape so every shoot matches the last one.
Product Photos for Gift Season
Holiday shoppers want to see the product the way it will be given, as well as the way it will be used. Add a few gift-season shots to your secondary images:
- The product in its packaging or a gift box, showing what the recipient will open.
- A what’s-in-the-box flat lay for kits and sets.
- Seasonal lifestyle images, with your main image kept on white so marketplace rules still apply.
Design those shots for phones. Adobe found 66.5% of online sales on Christmas Day 2025 happened on a smartphone. Our guide to holiday marketing ideas covers the December dates these photos should be ready for. The unboxing experience shows why packaging deserves its own shot.
Should You Do Product Photography Yourself or Hire a Photographer?
Do it yourself when you have a small catalog of simple products and time to learn. Hire help when the product is hard to shoot or the catalog is big.
| Situation | Do it yourself | Hire a photographer |
|---|---|---|
| Small catalog of simple, matte products | Yes | Not needed |
| Jewelry, glass, metal or other reflective items | Hard to get right | Yes |
| Lifestyle shoots with models or locations | Possible for simple setups | Yes |
| Large catalog that needs consistent results | Slow and hard to keep consistent | Yes |
| Marketplace listings with strict image rules | Yes, with careful editing | Saves rework |
If you’re unsure, start with DIY for your main images and hire a pro for lifestyle shots. That split gives you control over the basics and polish where it shows most. When you’re ready to hand it off, our e-commerce photography team shoots, edits and optimizes product images for online stores.
Final Thoughts
Good product photography is mostly discipline. Soft light, a steady camera and the same setup every time will beat an expensive camera used carelessly. Start with the shot list, check every image against the real product, and fix the gaps your customers ask about. Your photos should answer questions before anyone has to type them.
Work With SPEEDXMEDIA
SPEEDXMEDIA’s production team handles product photography from planning to final files, including white background, lifestyle and gift-season shoots. If your product pages need images that sell, contact SPEEDXMEDIA or call 442-4-SPEEDX. We’re based in Burbank and shoot for brands across Los Angeles.